

Key Takeaways
How a Toilet Tank Works
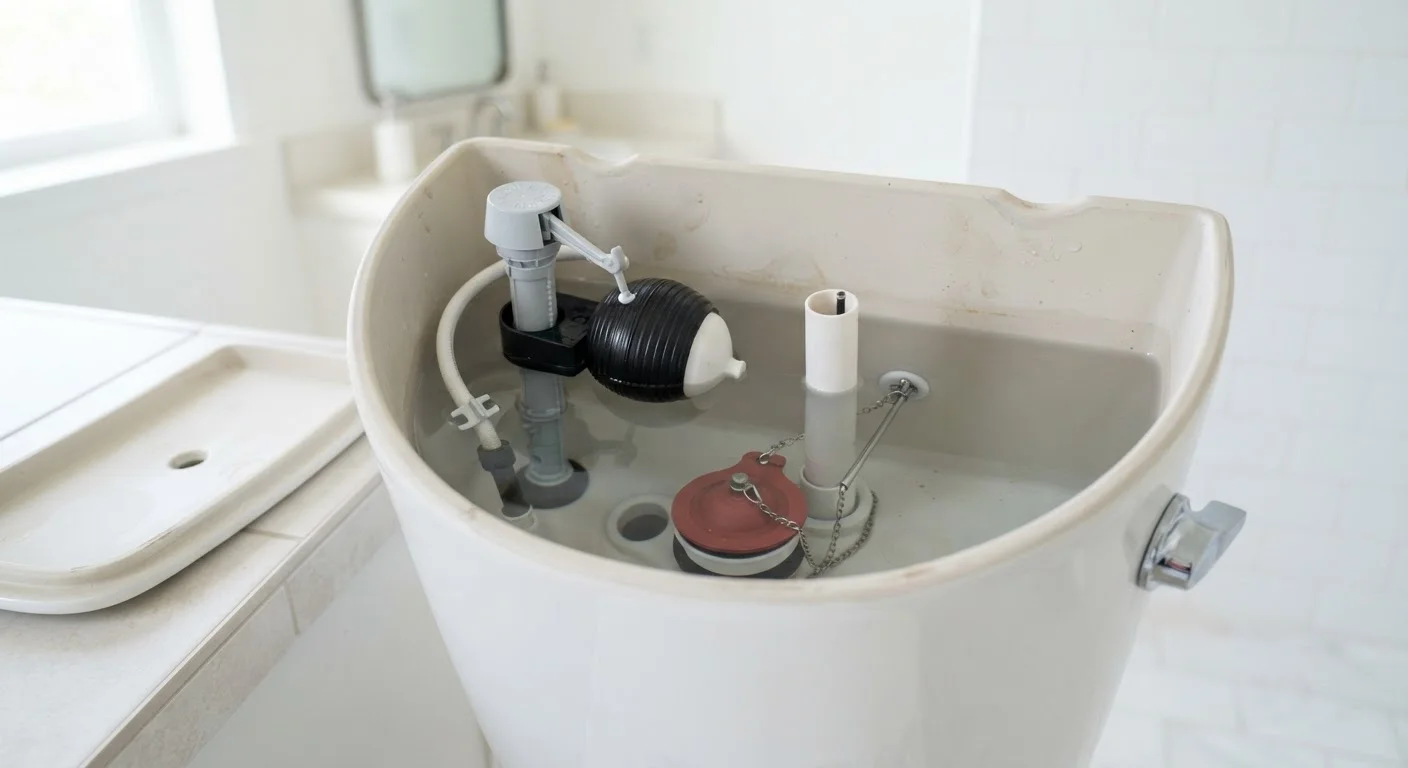
Before you can fix a running toilet, it helps to understand what's happening inside that tank. Three main components control the fill-and-flush cycle:
- The flapper - a rubber seal at the bottom of the tank that lifts when you flush and drops back down to allow the tank to refill. Over time, rubber degrades and the flapper may no longer form a watertight seal.
- The fill valve (sometimes called a ballcock) - the mechanism that controls water flowing back into the tank after a flush. When the water reaches the correct level, the fill valve shuts off.
- The float - a device, either a ball float on an arm or a cylindrical cup float, that rises with the water level and signals the fill valve to close. If the float is set too high, water overflows into the overflow tube and the fill valve never shuts off.
A toilet runs continuously when water escapes the tank faster than it should - either through a bad flapper or down the overflow tube - forcing the fill valve to keep running to compensate. Understanding which part is failing tells you exactly what to buy and replace.
Diagnosing the Problem
Accurate diagnosis saves you from replacing parts that don't need replacing. Try these tests before purchasing anything:
The Food Coloring Test
Add a few drops of food coloring to the tank and wait 10-15 minutes without flushing. If color appears in the bowl, water is seeping past the flapper - the flapper needs replacing.
Check the Overflow Tube
Remove the tank lid and look at the overflow tube - the open vertical tube standing in the center of the tank. If water is trickling or flowing into it, your float is set too high or your fill valve is not shutting off properly. The water level should sit roughly one inch below the top of the overflow tube.
Listen and Observe
If you hear a hissing sound even when the bowl test shows no dye, the fill valve itself may be worn and unable to fully close. A phantom flush - where the toilet refills on its own without anyone flushing - almost always points to a leaking flapper.
Deferred repairs like a running toilet tend to compound. See our guide on the hidden costs of skipping small repairs to understand why acting quickly matters.
Write the Date on Replacement Parts
Use a permanent marker to note the installation date on your new flapper or fill valve. Flappers typically last 4-7 years depending on water chemistry. Knowing when a part was installed helps you anticipate the next replacement before a problem develops.
What You'll Need
Gather the following before you begin. Having everything on hand prevents mid-repair trips to the hardware store.
What you will need
Step-by-Step Repair Guide
Work through the steps below in order. Most repairs take under an hour even for first-timers. If you identify a specific faulty part during diagnosis, focus on the steps relevant to that component.
Shut Off the Water Supply
Locate the shutoff valve on the wall behind or beneath the toilet. Turn it clockwise until it stops. Flush the toilet once to empty the tank, then confirm no water refills - this verifies the valve is fully closed.
Remove the Tank Lid and Drain Remaining Water
Carefully lift the tank lid and set it flat on a towel - tank lids are heavy porcelain and crack easily. Use a sponge to soak up any water remaining at the bottom of the tank after flushing.
Replace the Flapper (If That's the Culprit)
Unhook the flapper ears from the pegs on either side of the flush valve seat, and disconnect the chain from the flush handle arm. Bring the old flapper to the hardware store to match the size and style. Snap the new flapper's ears onto the pegs, attach the chain to the handle arm leaving about half an inch of slack, and ensure the flapper seats flat over the drain opening.
Adjust or Replace the Fill Valve
If the water level is overflowing into the overflow tube, adjust the float first. On a ball-float style, bend the float arm gently downward or turn the adjustment screw. On a cup-float style, pinch the clip and slide the float down the fill valve shaft. The goal is a water level sitting about one inch below the overflow tube top. If the fill valve hisses or runs even after adjustment, the entire fill valve assembly needs replacing - turn off the water, disconnect the supply line at the base of the tank, unscrew the locknut, and swap in the new unit per its package instructions.
Restore Water and Test
Turn the shutoff valve back on slowly and allow the tank to refill. Observe the water level as it rises - it should stop about one inch below the overflow tube. Flush once and watch the full cycle: the flapper should lift cleanly, the bowl should flush completely, the flapper should seat firmly, and the fill valve should shut off when the tank is full. If everything stops running within 60 seconds of flushing, the repair is complete.